
In digital marketing, tracking data and collecting first-party data are essential for brands. In the past, tracking user behaviour on a website often meant relying on engineers to change the site’s code. Today, with two powerful tools, Google Tag Manager (GTM) and Google Analytics 4 (GA4), even marketers with no technical background can track website behaviour easily.
When people first start using GTM, many find setting up events complicated and hard to learn, and often get stuck not knowing whether they have set things up correctly. In fact, once you understand the setup logic, tracking button clicks, form submissions or other custom events on your website becomes straightforward. Let’s learn how to set up GA4 event tracking simply with GTM.
Understand this logic and GTM setup gets easier
Before setting anything up, let’s understand the core tracking principle behind GTM. The setup logic is not complicated. Once you understand the following two components and combine them according to what you want to track, you can set up events quickly:
- Tag: tells GTM what to do, for example send “what data” to “which platform”
- Trigger: decides “when” to send the data
In a real scenario, suppose we want to track clicks on the “Contact us” button on the website and send the data to GA4. The two components would be:
- Tag send a “click event” to “GA4”
- Trigger send the data when the “Contact us” button is clicked
Each of these components has its own settings area in GTM. First clarify what behaviour you are tracking, then think about when it happens, and you can apply this logic to set up tracking for any GA event quickly.
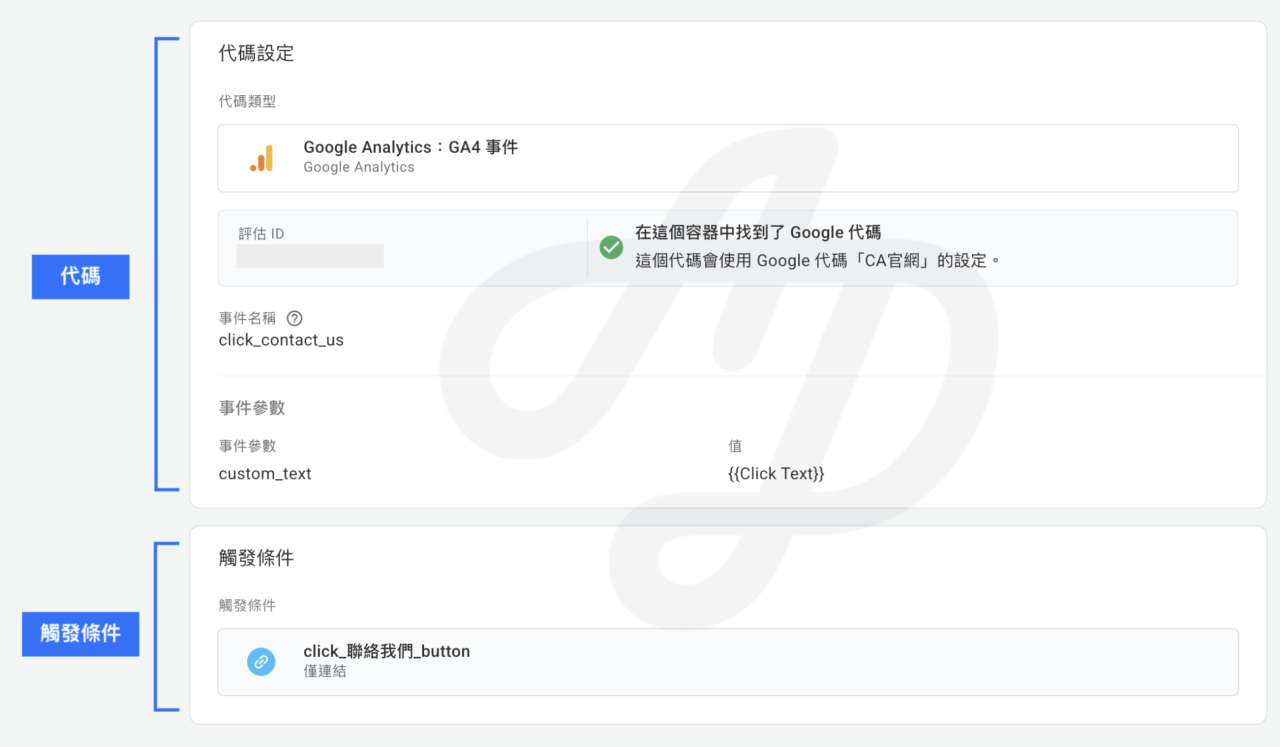
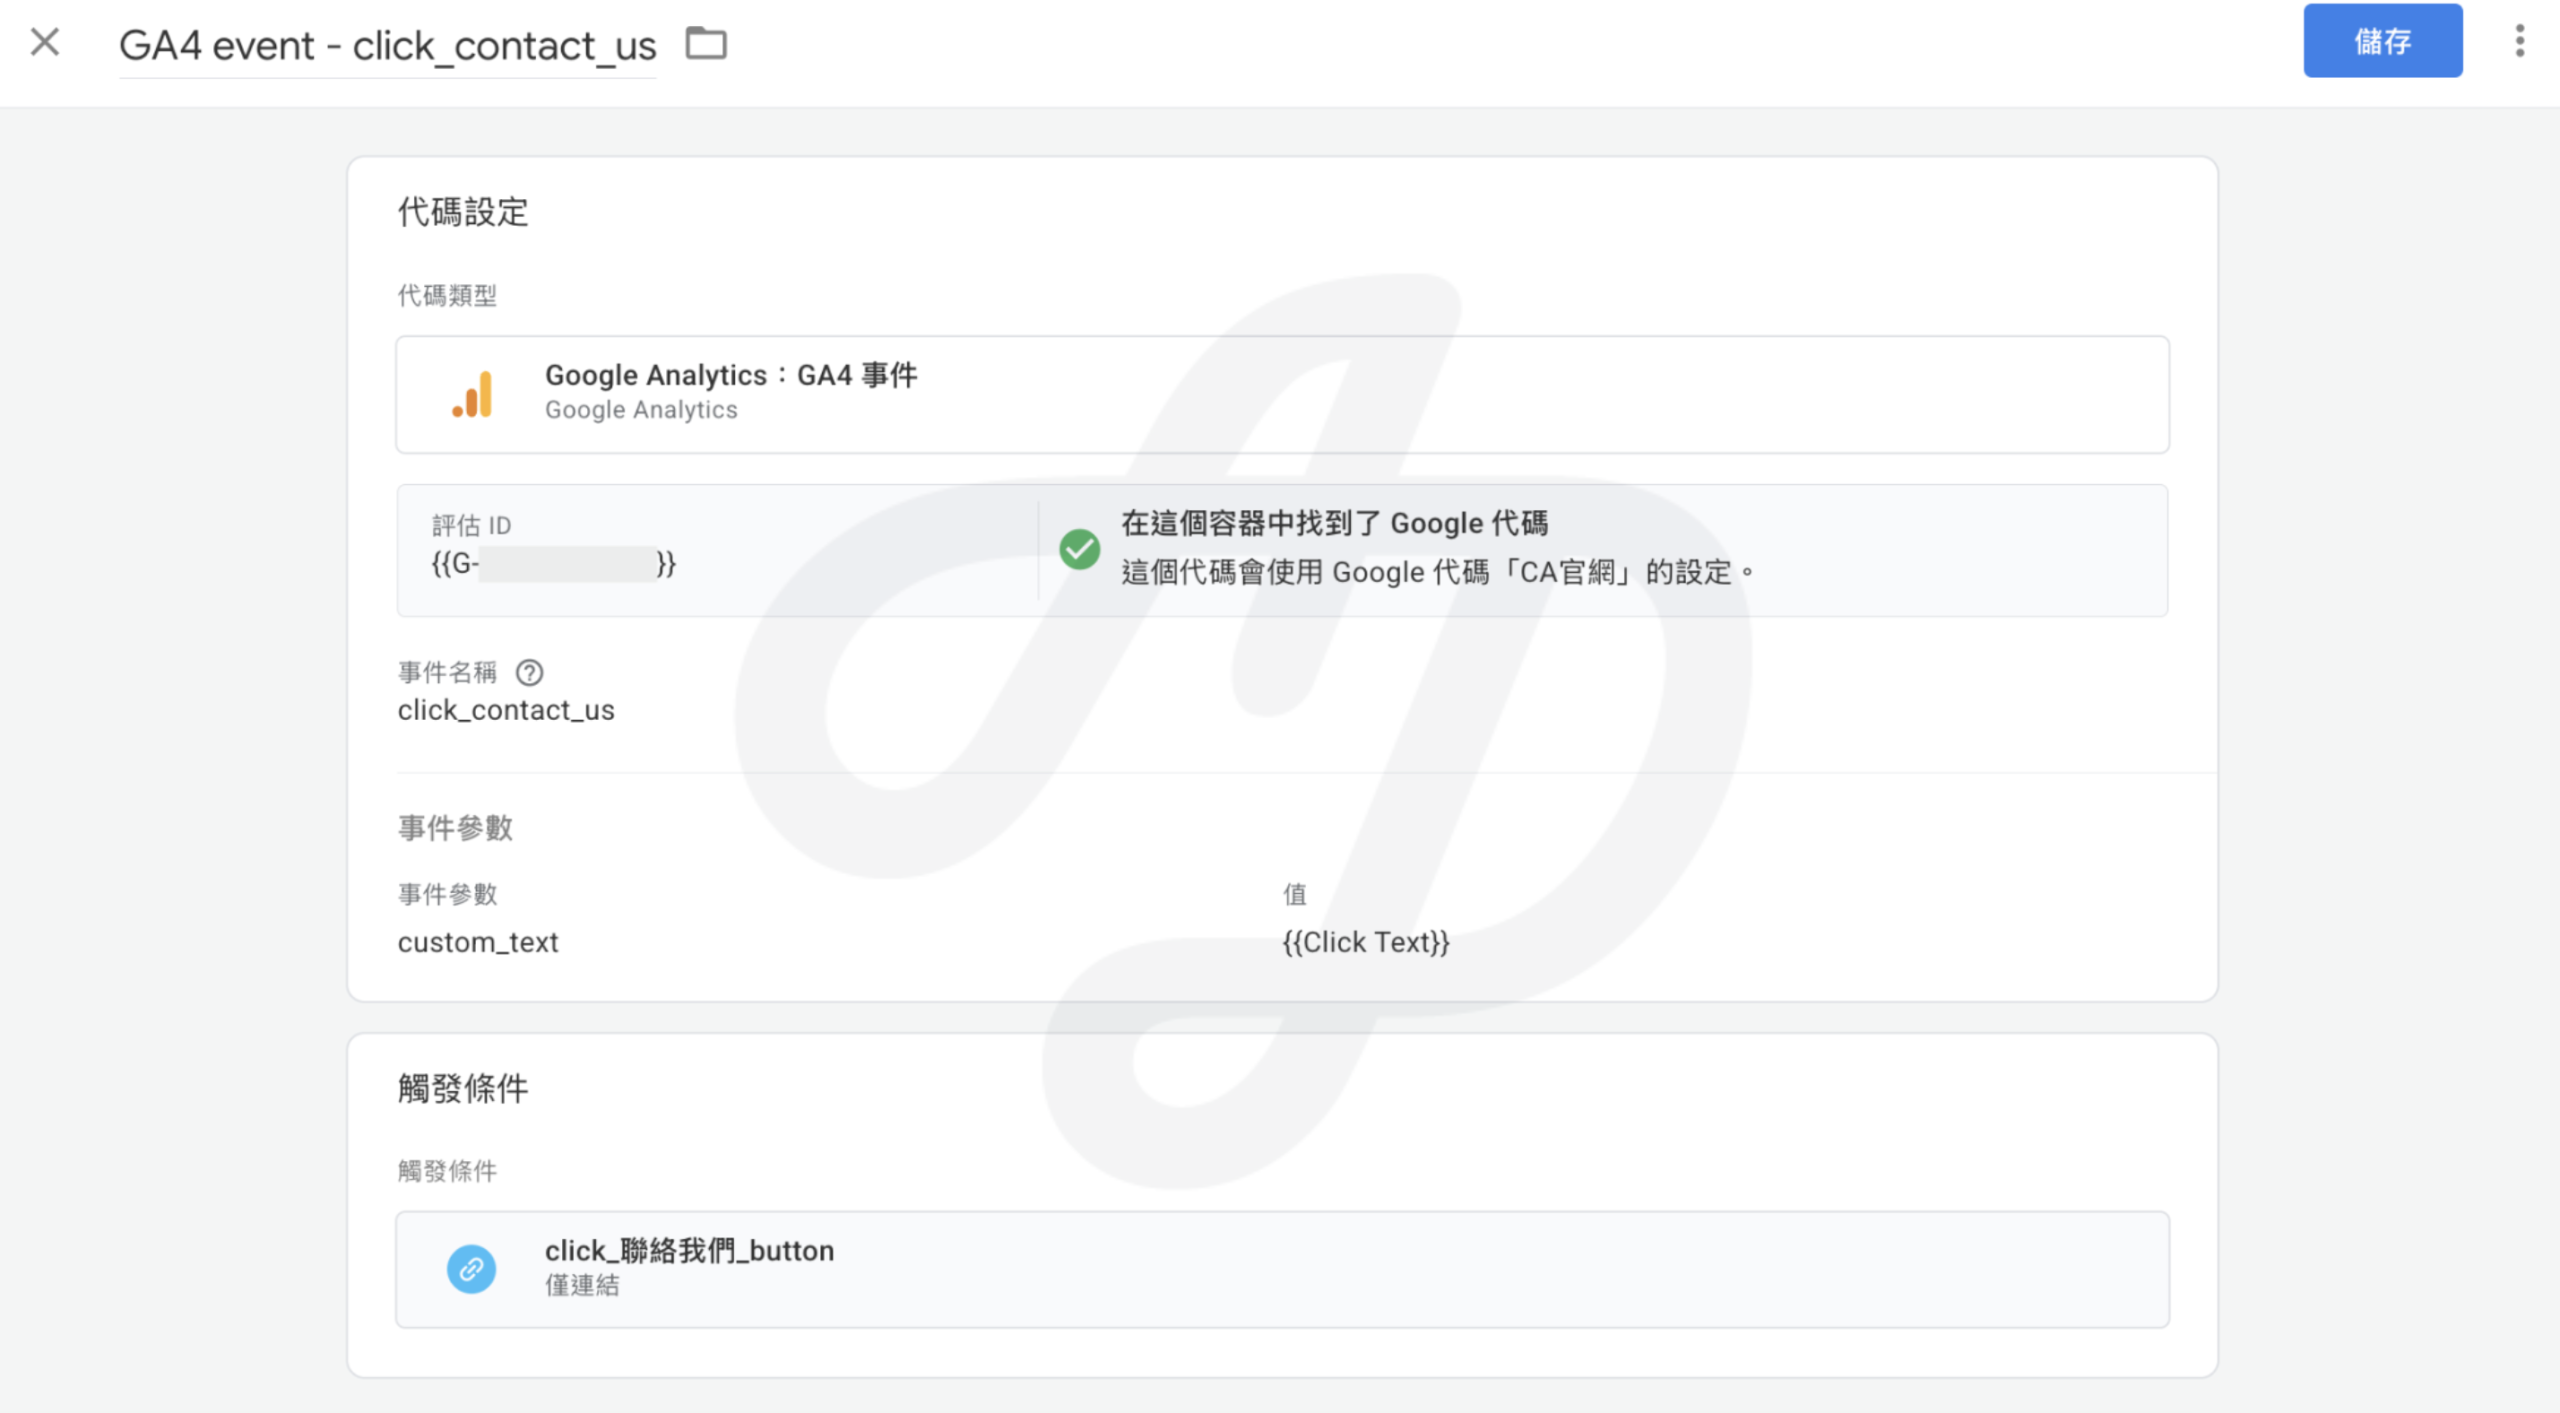
Example of the GTM event tag setup screen
GTM setup, step by step
Now let’s try it: how to use GTM to set up tracking for clicks on the “Contact us” button and send the event data accurately to GA4.
0. Preparation
Before you start, complete the following:
- Create a GA4 account and property and a GTM account and container (skip if already done)
- Ask your engineer to install the GTM code on the website; see the official article
- Deploy the basic GA4 tag in GTM; see CloudAD’s earlier article
- Use the Chrome browser and install the Tag Assistant extension
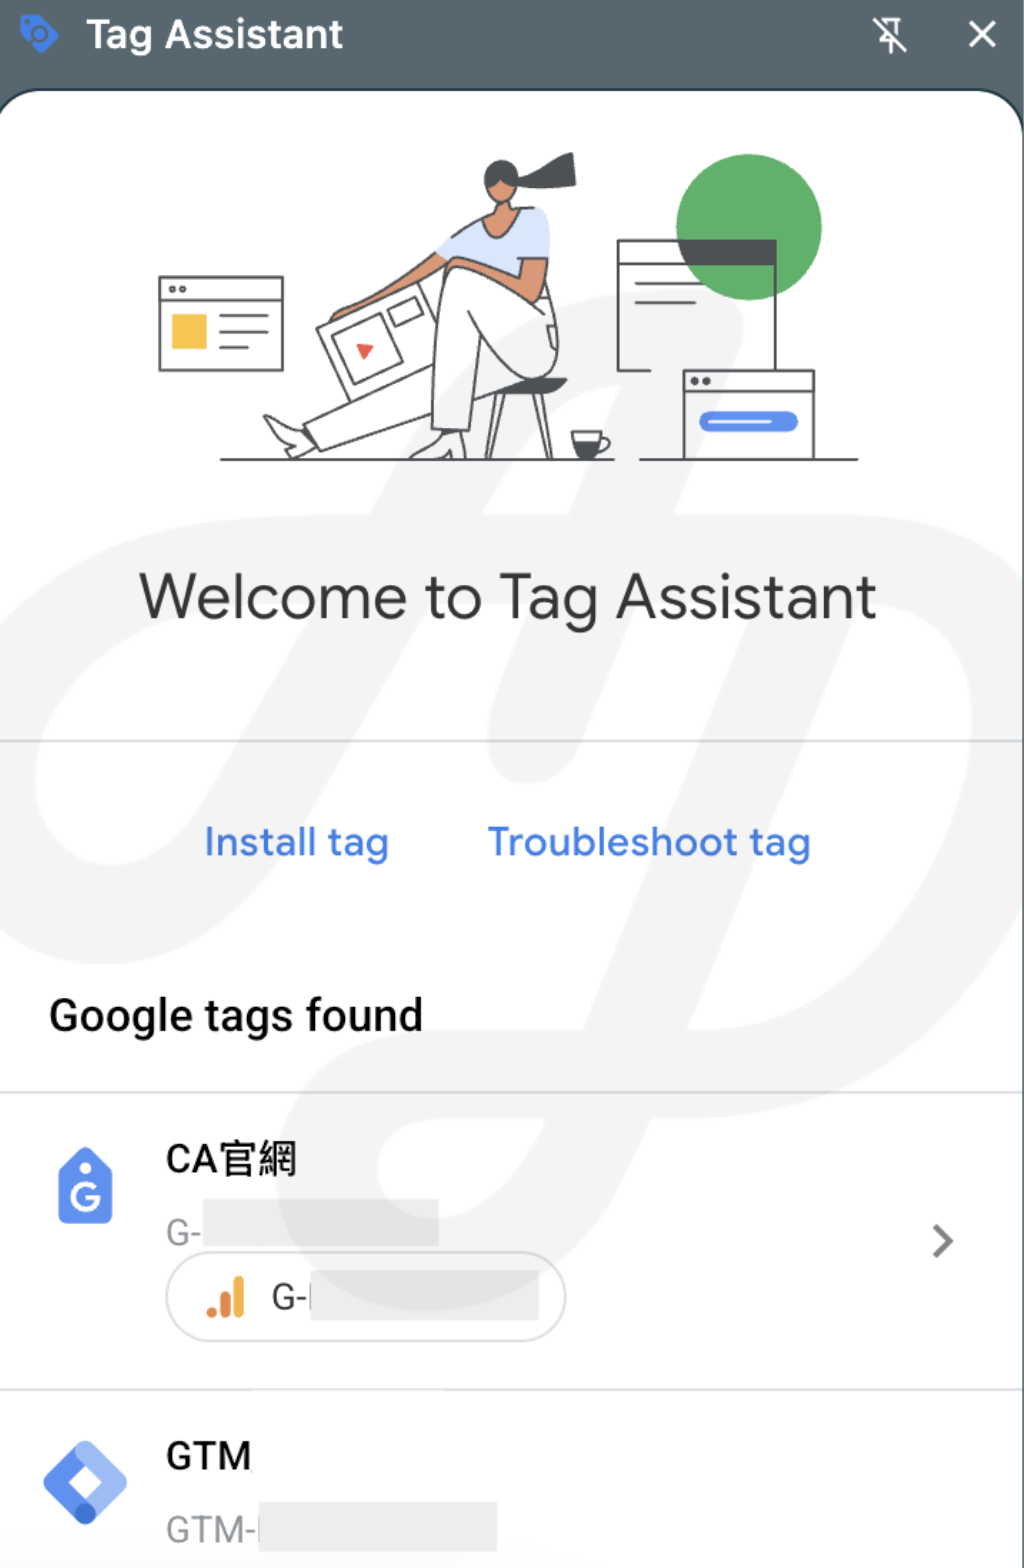
Once done, click the Tag Assistant extension. If you see the GTM icon and ID, the installation is complete.
If you run into any difficulties with account creation, permissions or tag deployment, the CloudAD team also offers GA4 and GTM setup and consulting services. Get in touch to discuss.
1. Add and configure the event tag
First, tell GTM “what data to send” and “where to send it”. For clicks on the “Contact us” button, this means sending the click event data to GA4.
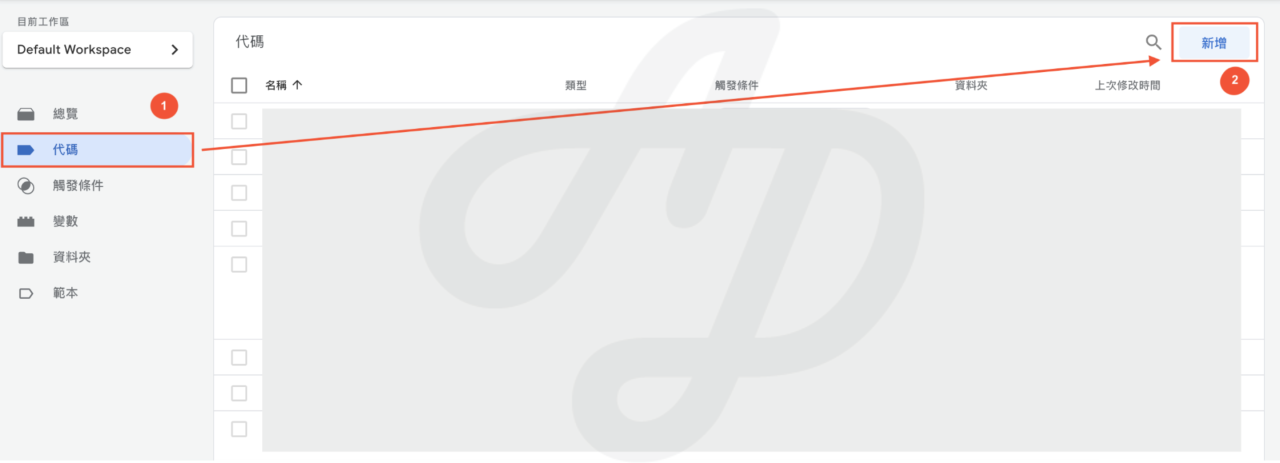
Click “Tags” on the left > click “New”
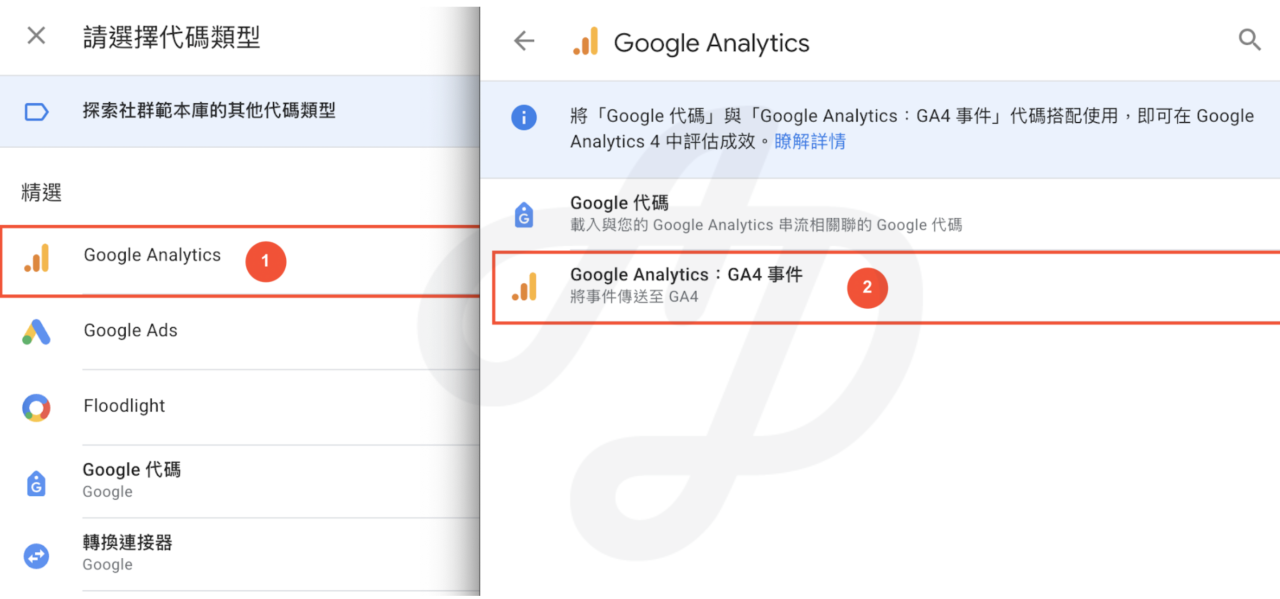
In the tag configuration area > choose Google Analytics > “Google Analytics: GA4 Event”
Enter the Measurement ID and the event name (this event name is the one that will appear in GA4)
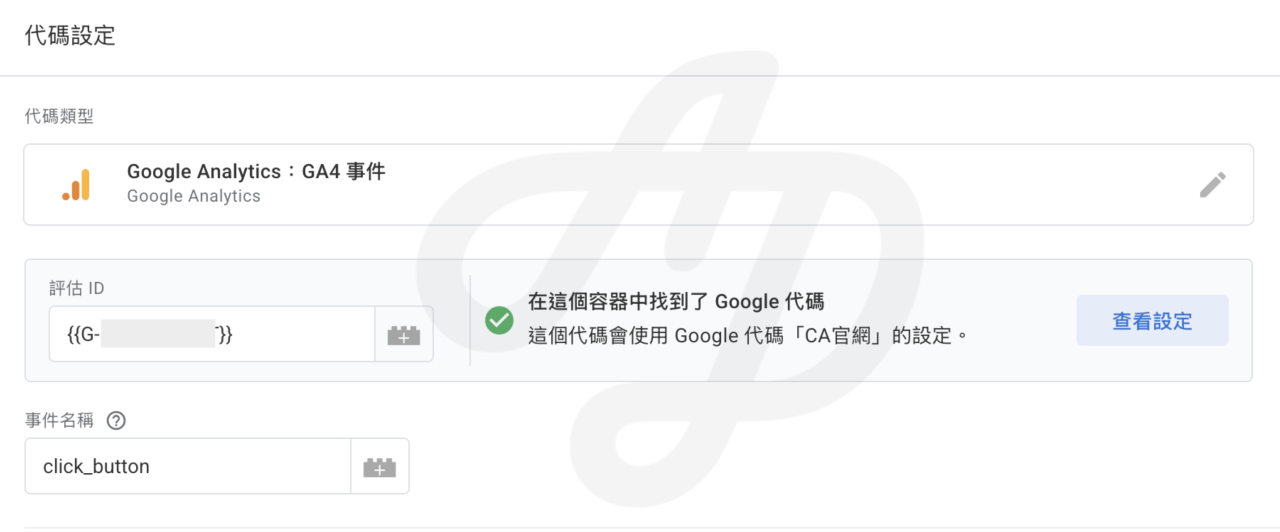
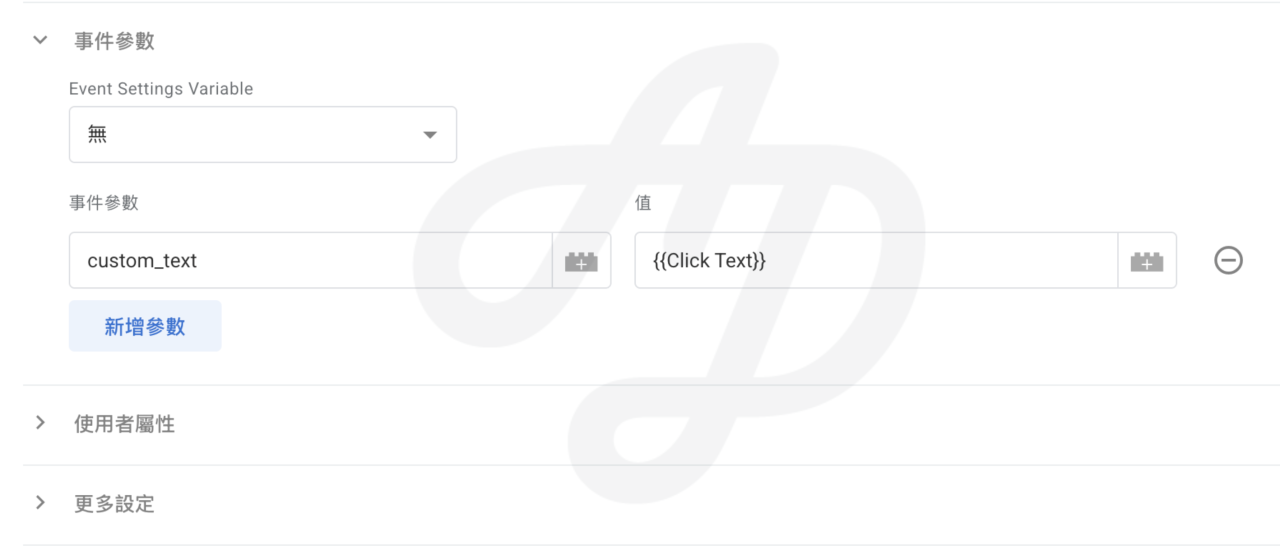
If you want more detail about this behaviour, you can also add event parameters. For example, to know which button the user clicked, you can tell them apart by the button text, and set the event parameter as custom_text = Contact us, or custom_text = Free GA4 consultation.
Parameter values can be fixed, or you can use variables to capture information about the user’s interaction at that moment.
2. Set up the trigger
Before setting up the trigger, note that some “buttons” look like button elements but are actually styled hyperlinks. If it is a real button click, choose “Click” as the trigger; if it is a link styled as a button, choose “Link Click” as the trigger.
Again taking the “Contact us” button as an example, it is actually a link to the “Contact us” page. To track how many times this button is clicked, the trigger should be set to send data to GA4 when the “Contact us” link is clicked.
With this concept in mind, we can set up the corresponding trigger.
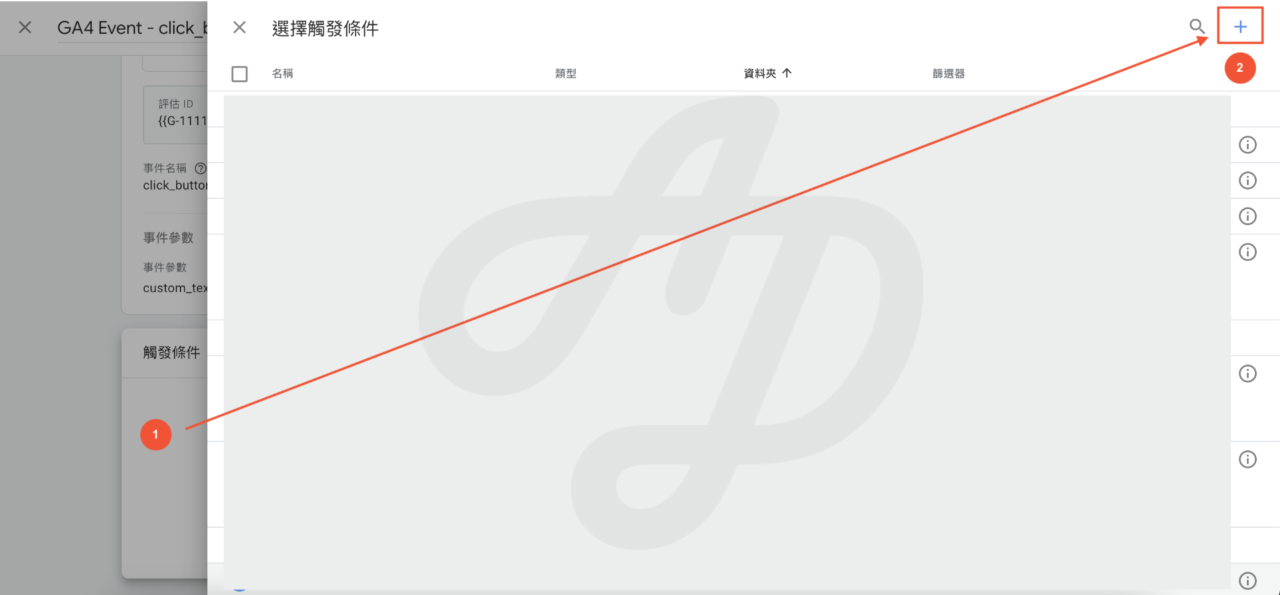
Click the “Triggering” area > click “+” in the top right to add a new trigger
Choose “Click – Just Links” as the trigger type > select “Some Link Clicks” > set the condition “Click URL” equals “https://cloudad.tech/contact/”
(*Adjust the trigger to suit your own website structure or event plan. The more conditions you add, the more precisely it fires.)
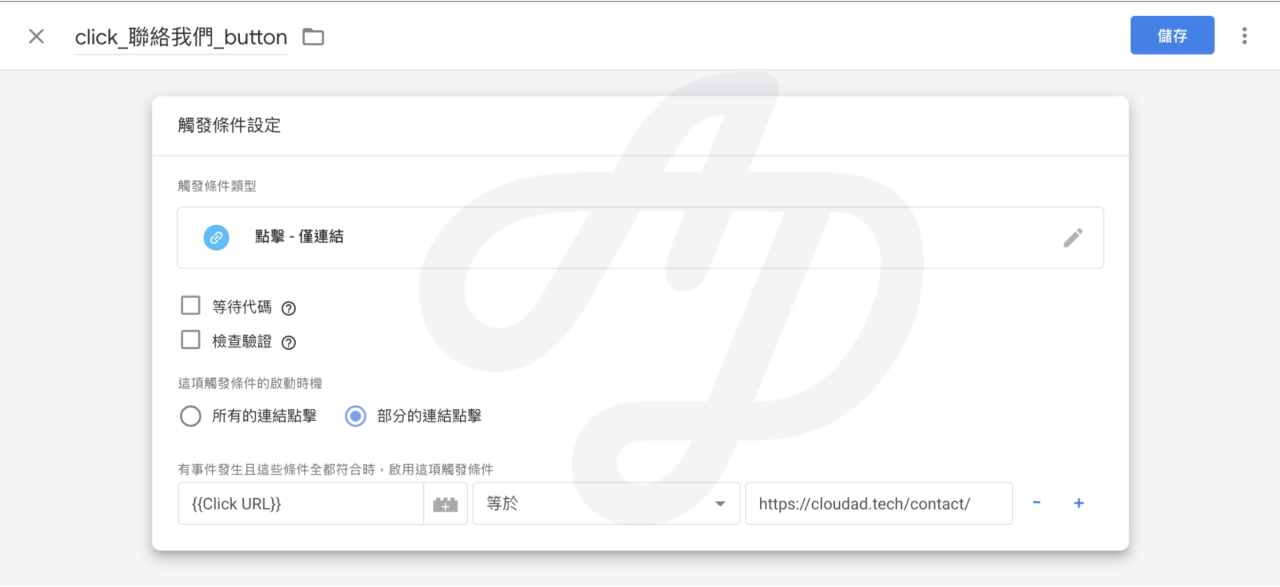
Once the tag and trigger are both set up, click “Save” in the top right.
3. Test in GTM preview mode
Once setup is complete, don’t rush to publish. Always use GTM preview mode together with GA4 DebugView to check that the setup is correct.
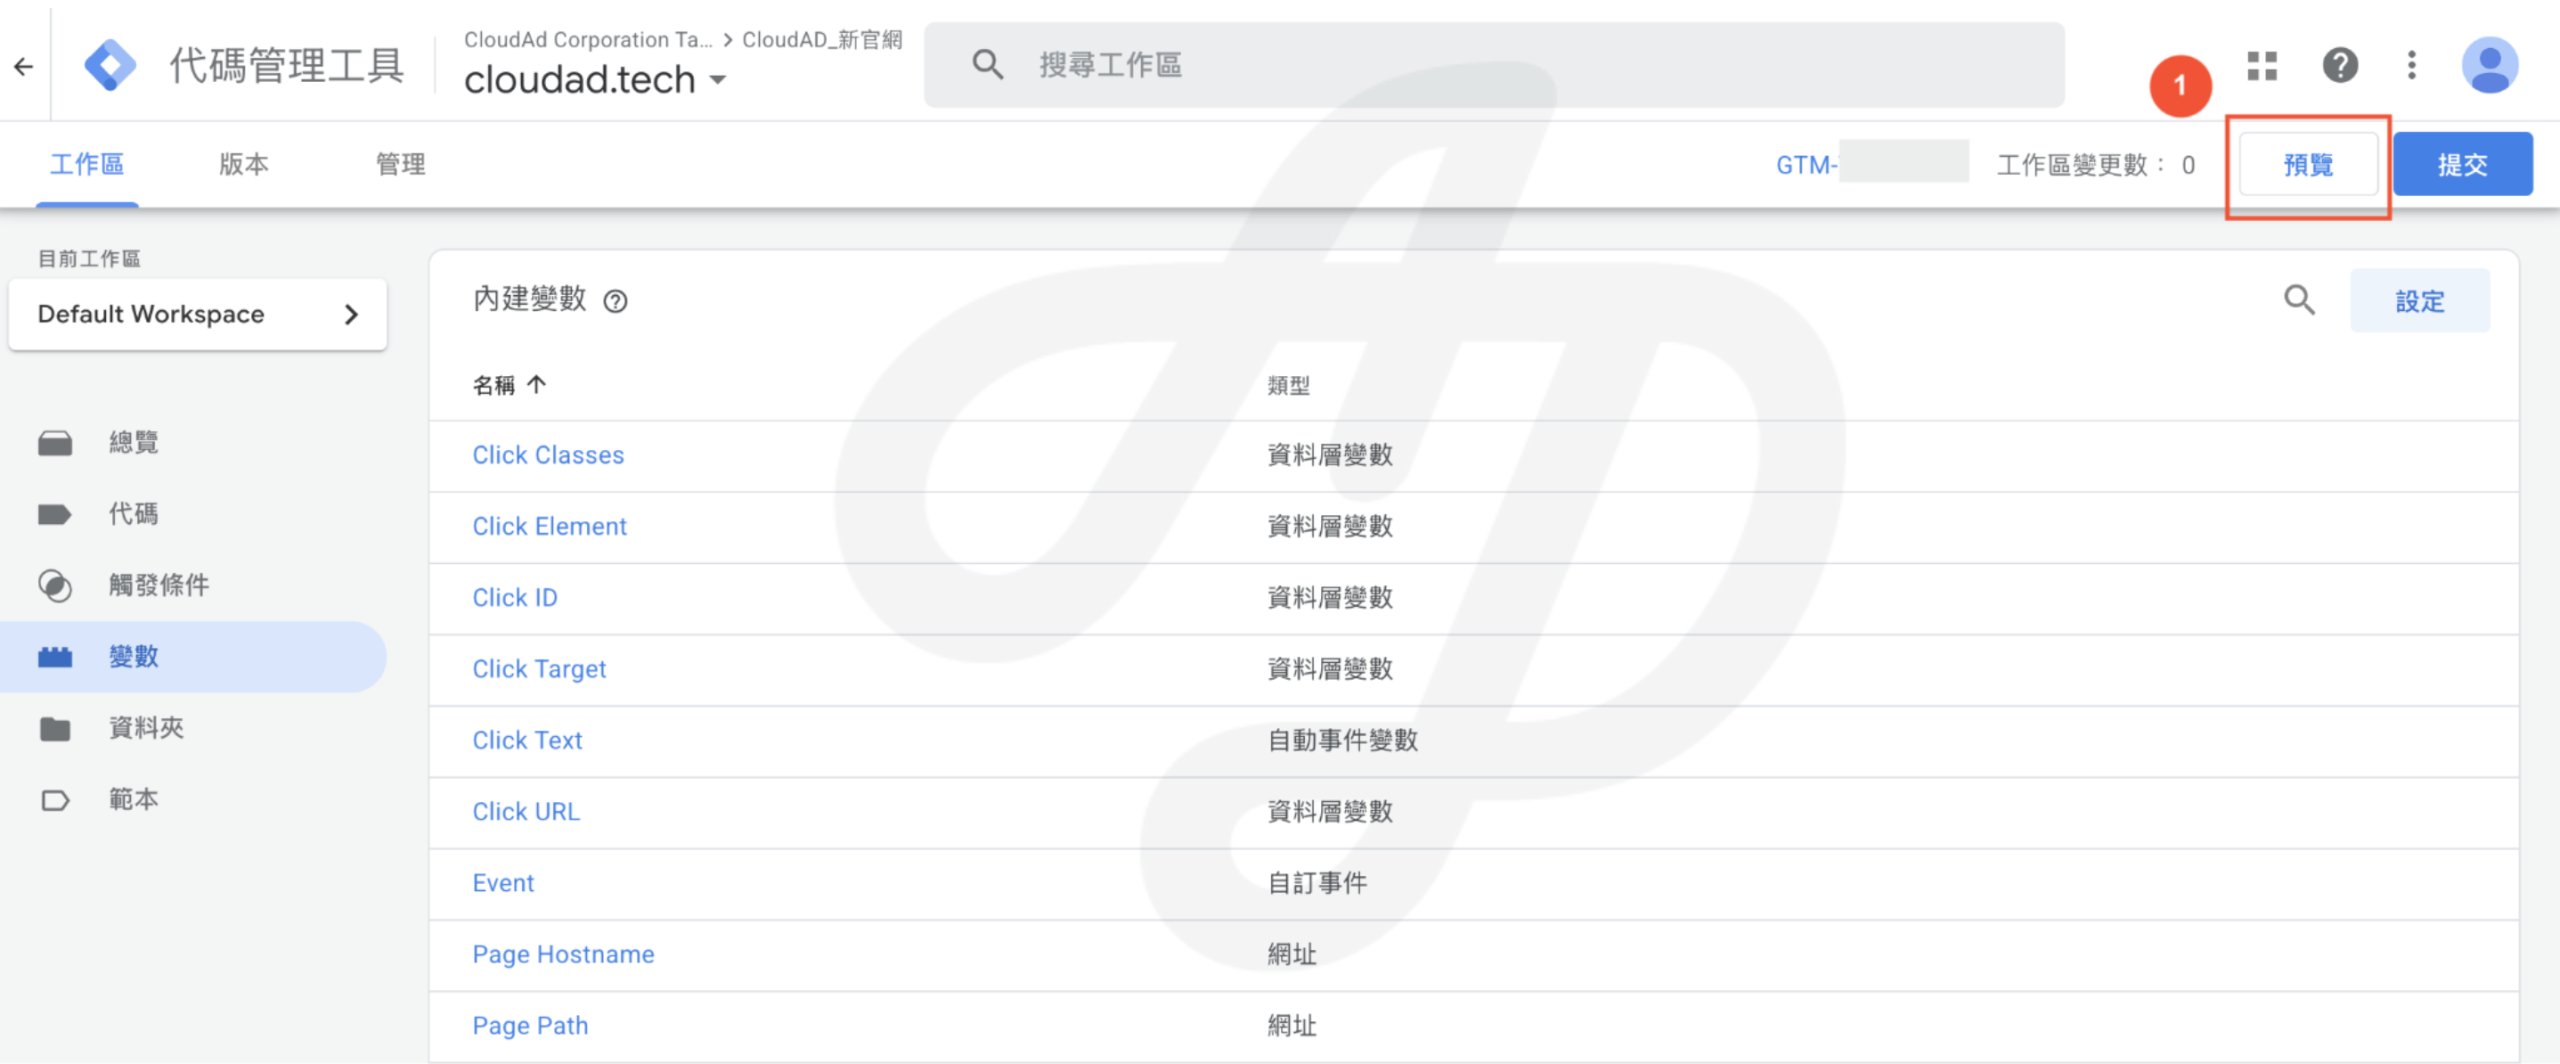
Click “Preview” in GTM
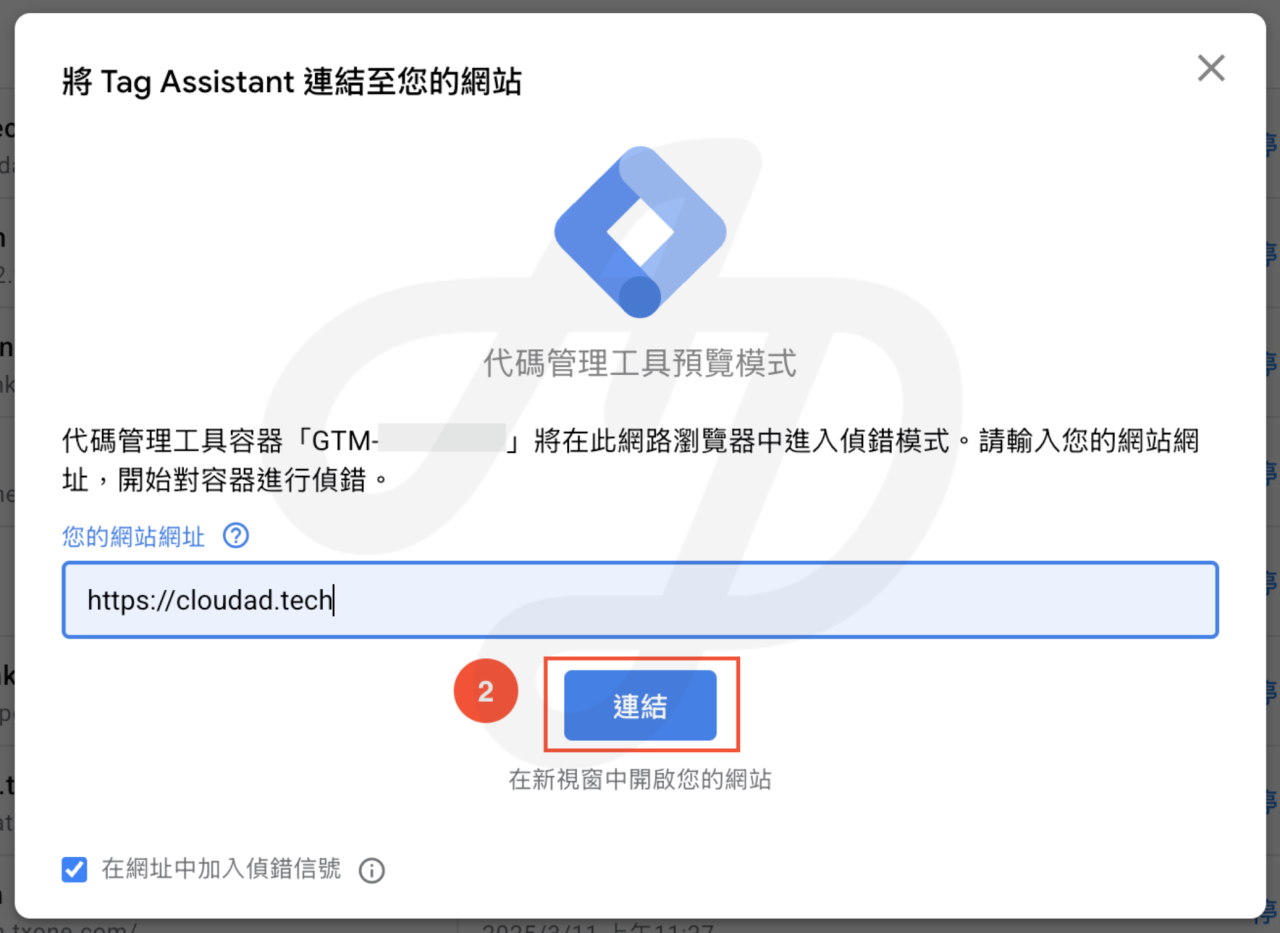
Enter the website URL > click “Connect” to enter preview mode
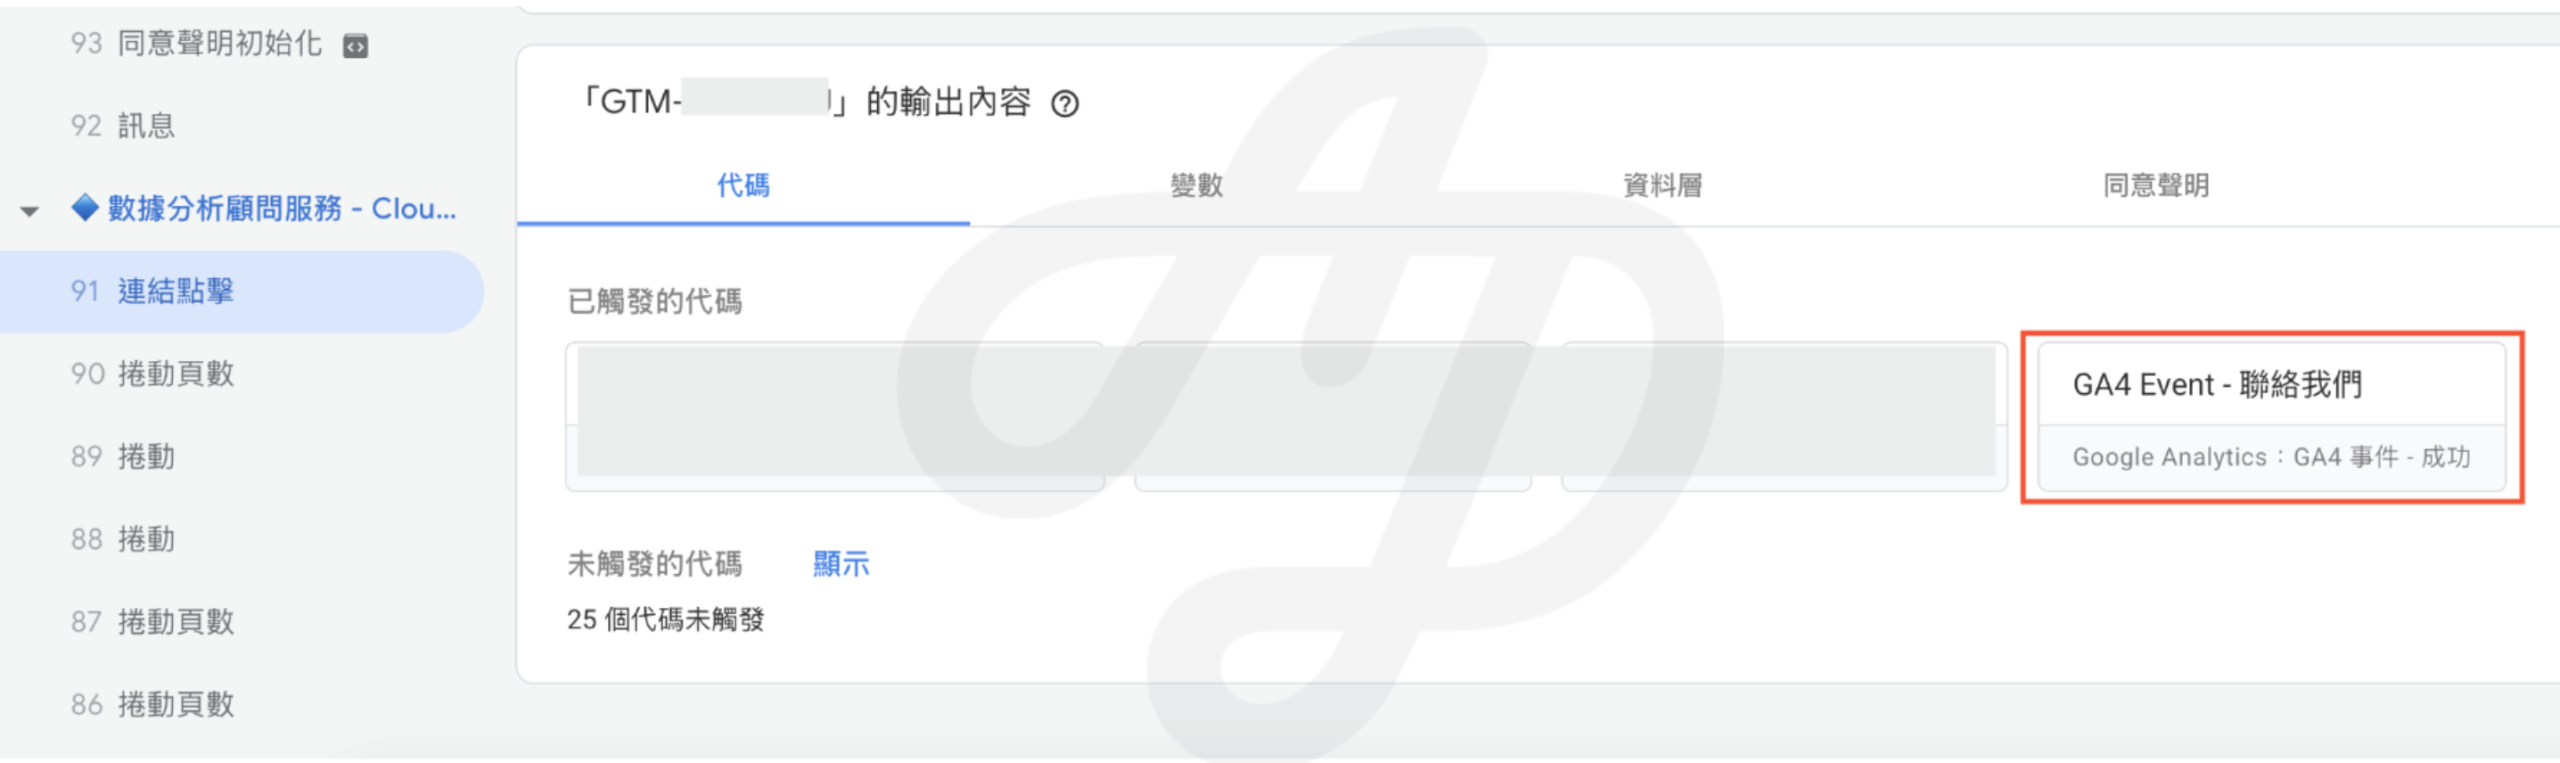
In preview mode, click the “Contact us” button

Check in Tag Assistant whether the event tag fired
Check in GA4 DebugView whether the event was received (DebugView may take 10–15 seconds to receive data)
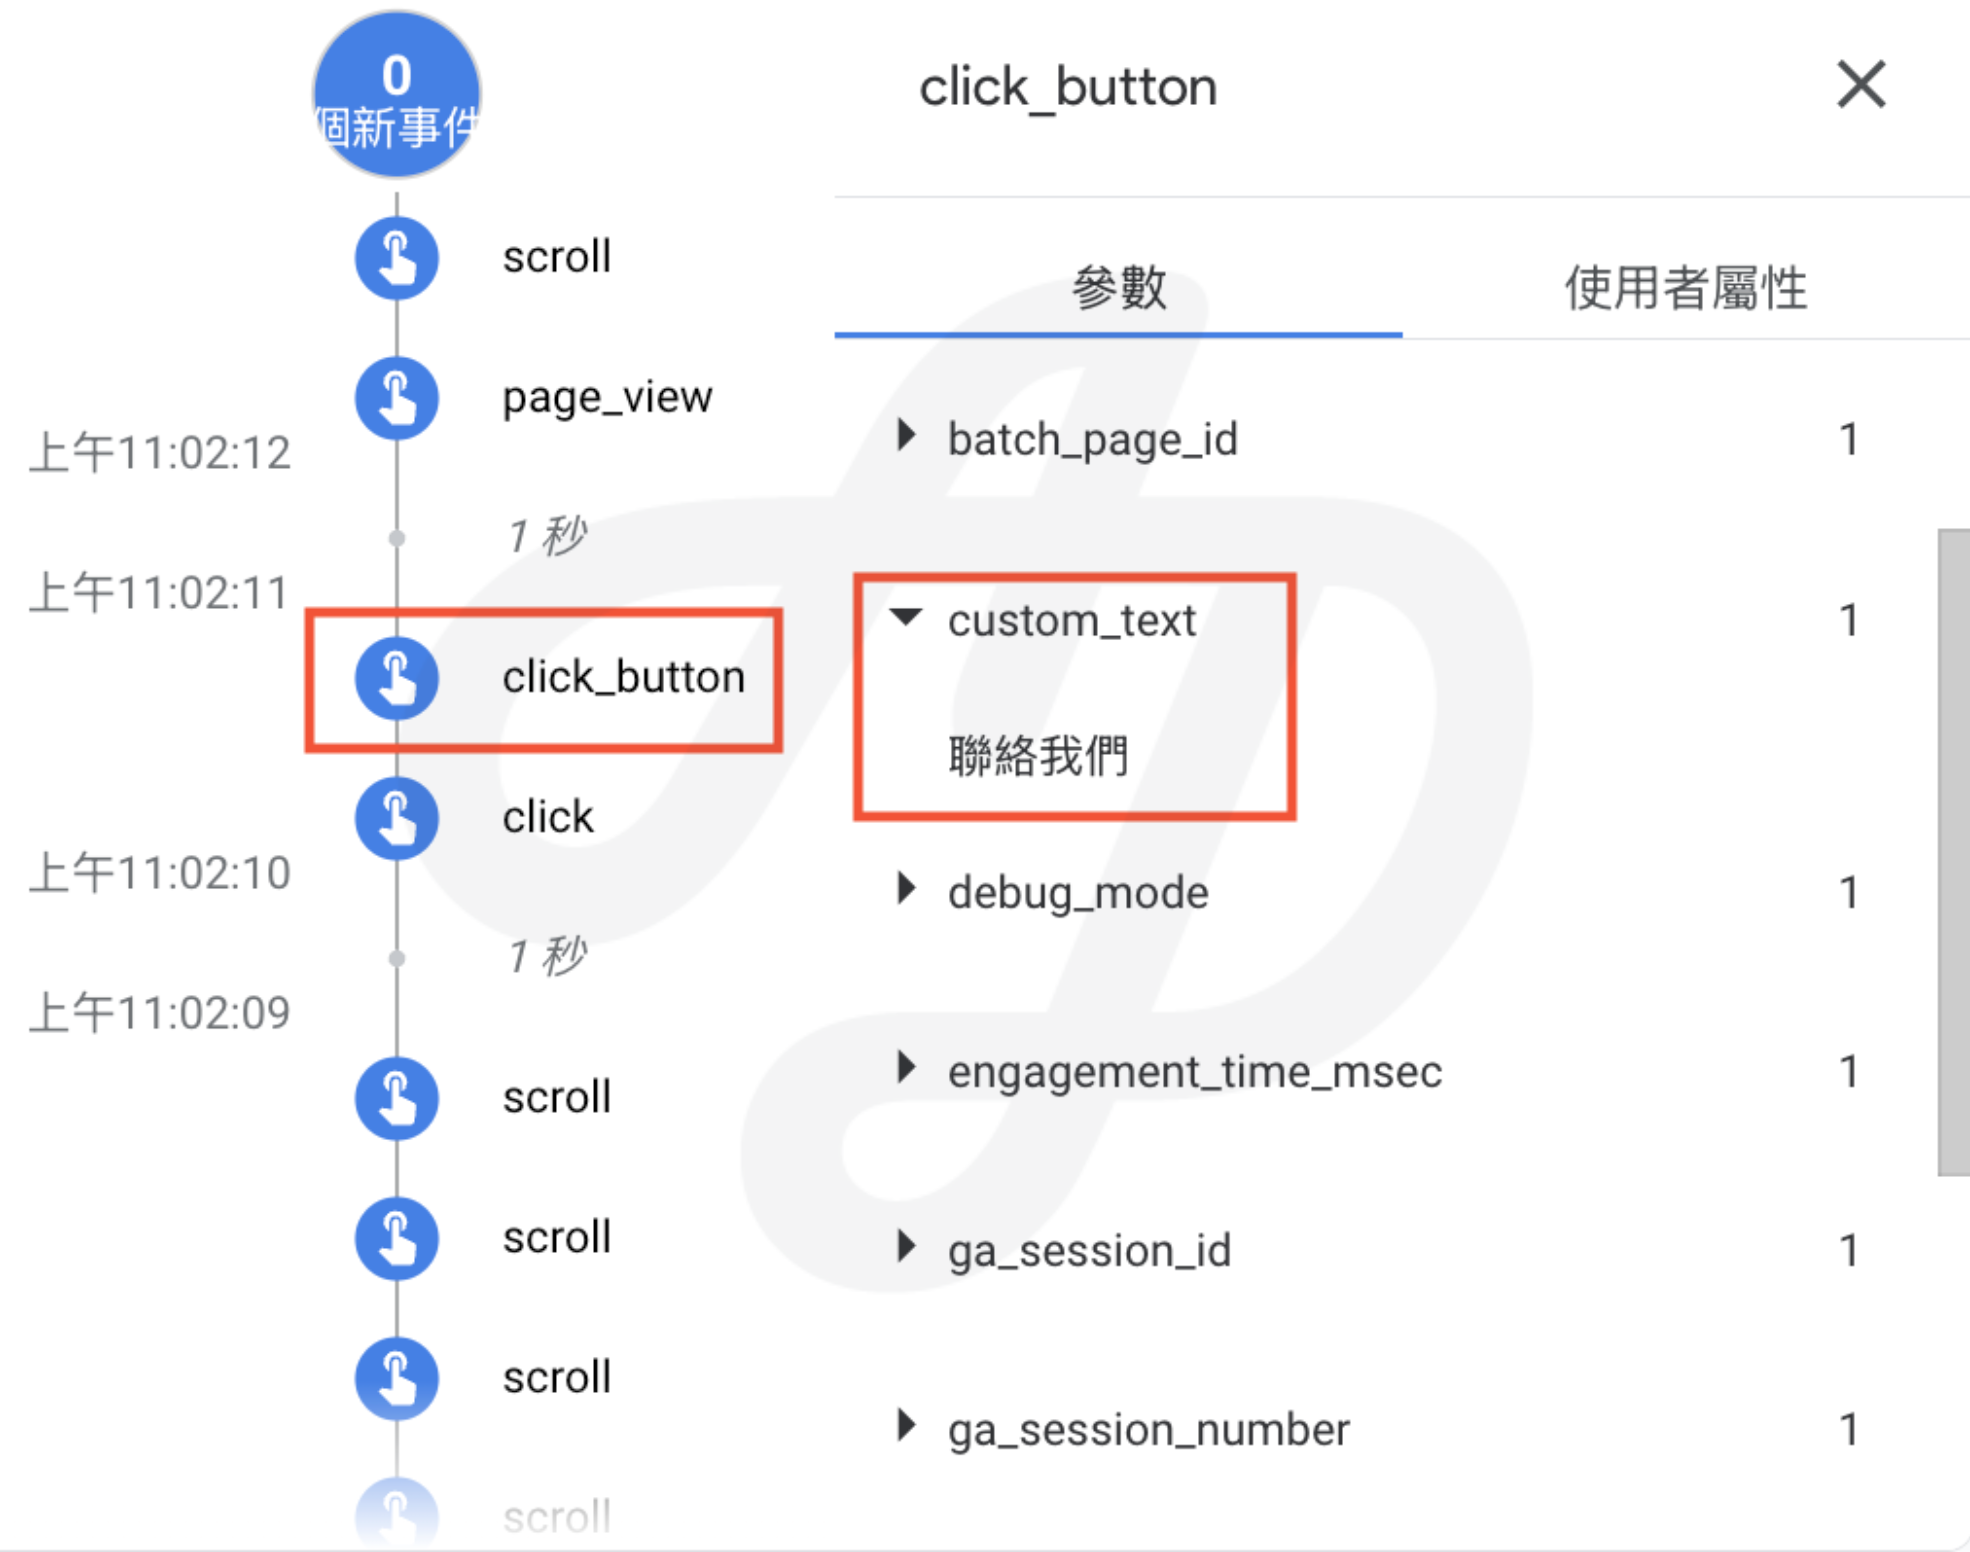
You can expand the event to check that the parameters and parameter values sent are correct.
4. Publish in GTM
If the setup passes testing, you are ready to go live.
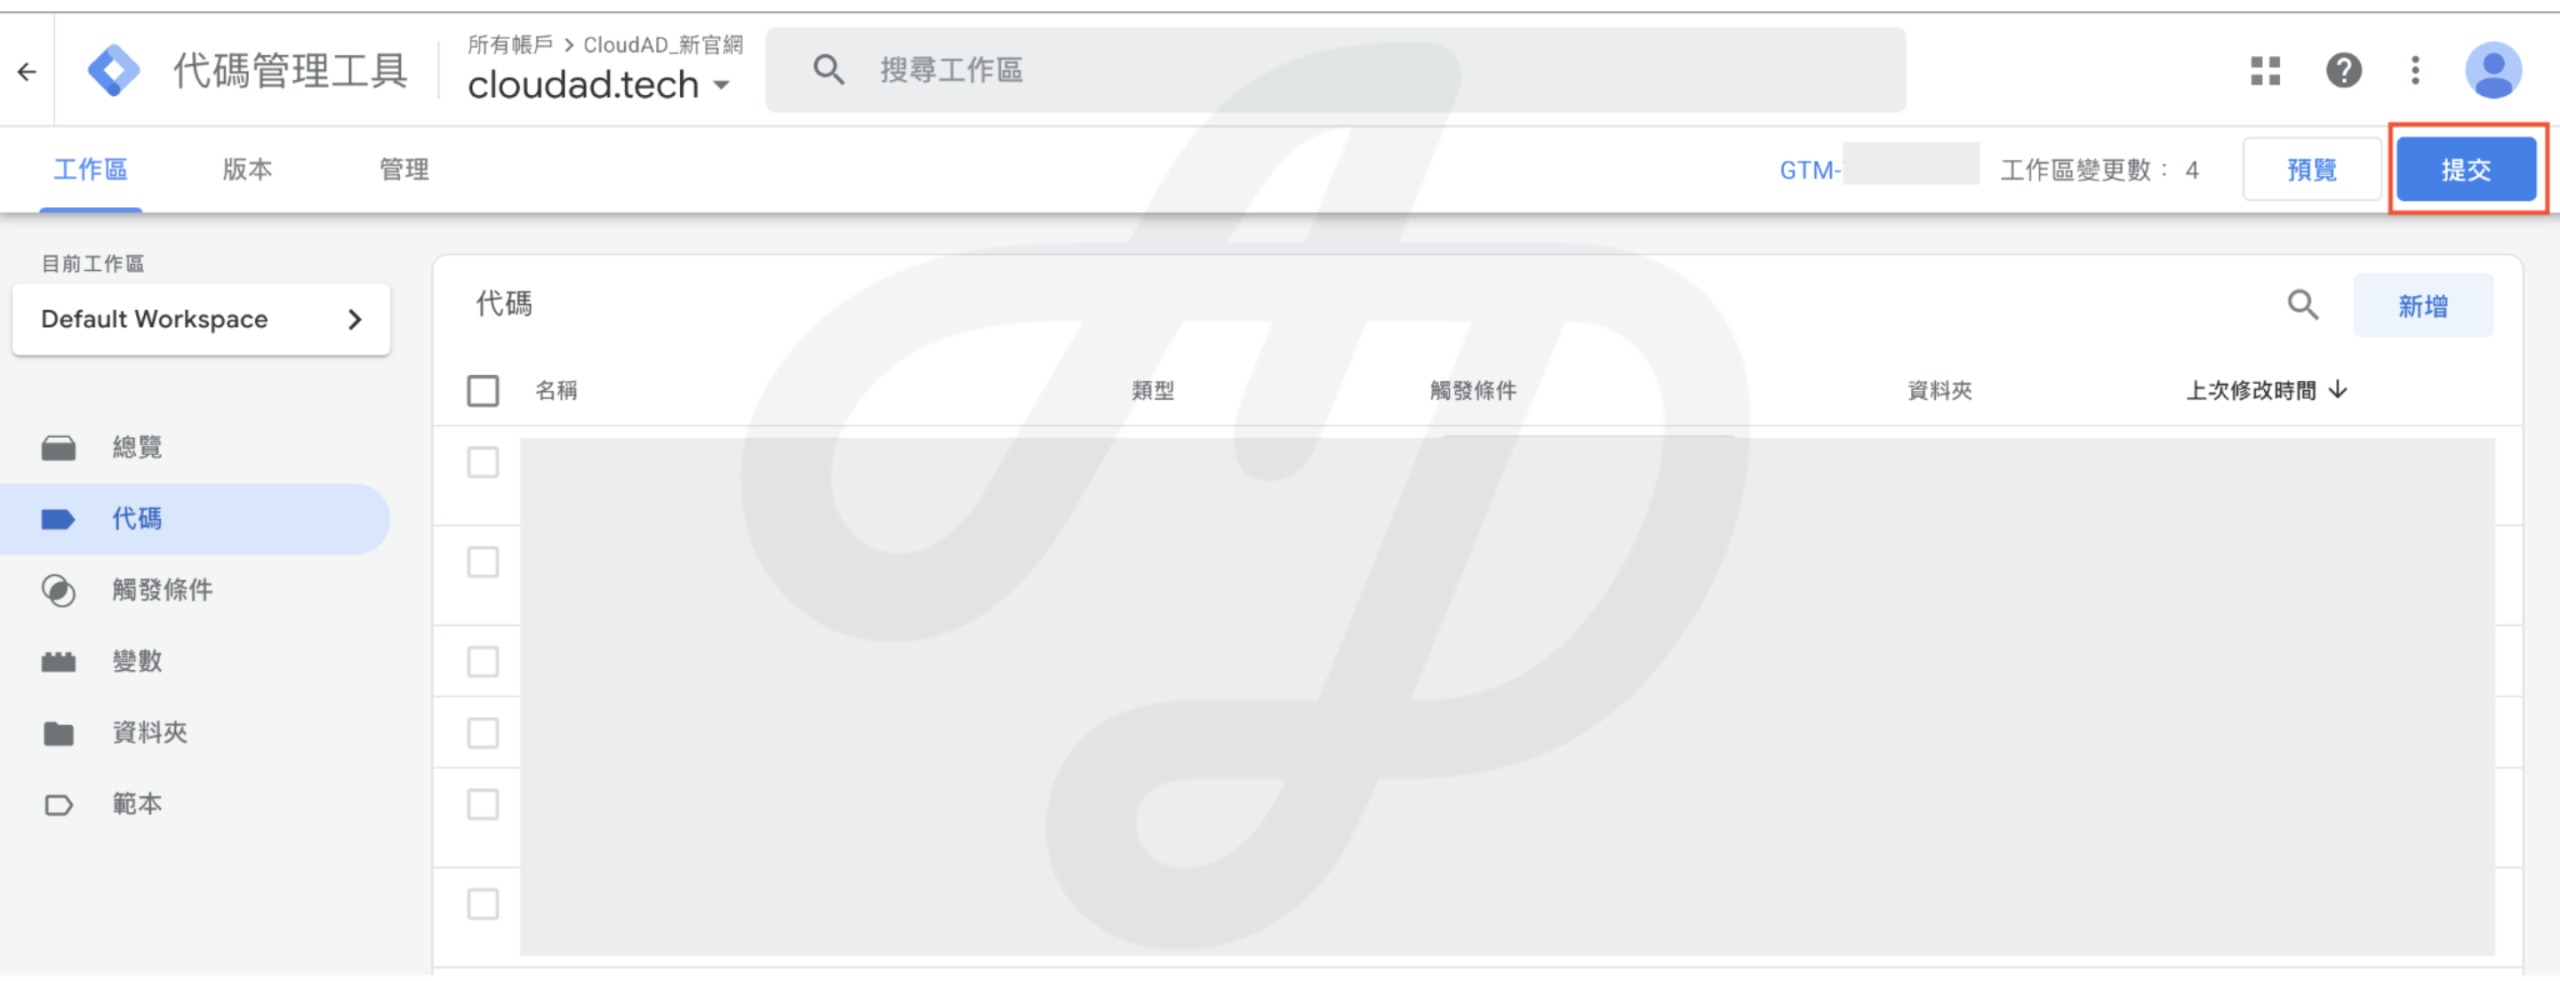
Click the blue “Submit” button in the top right
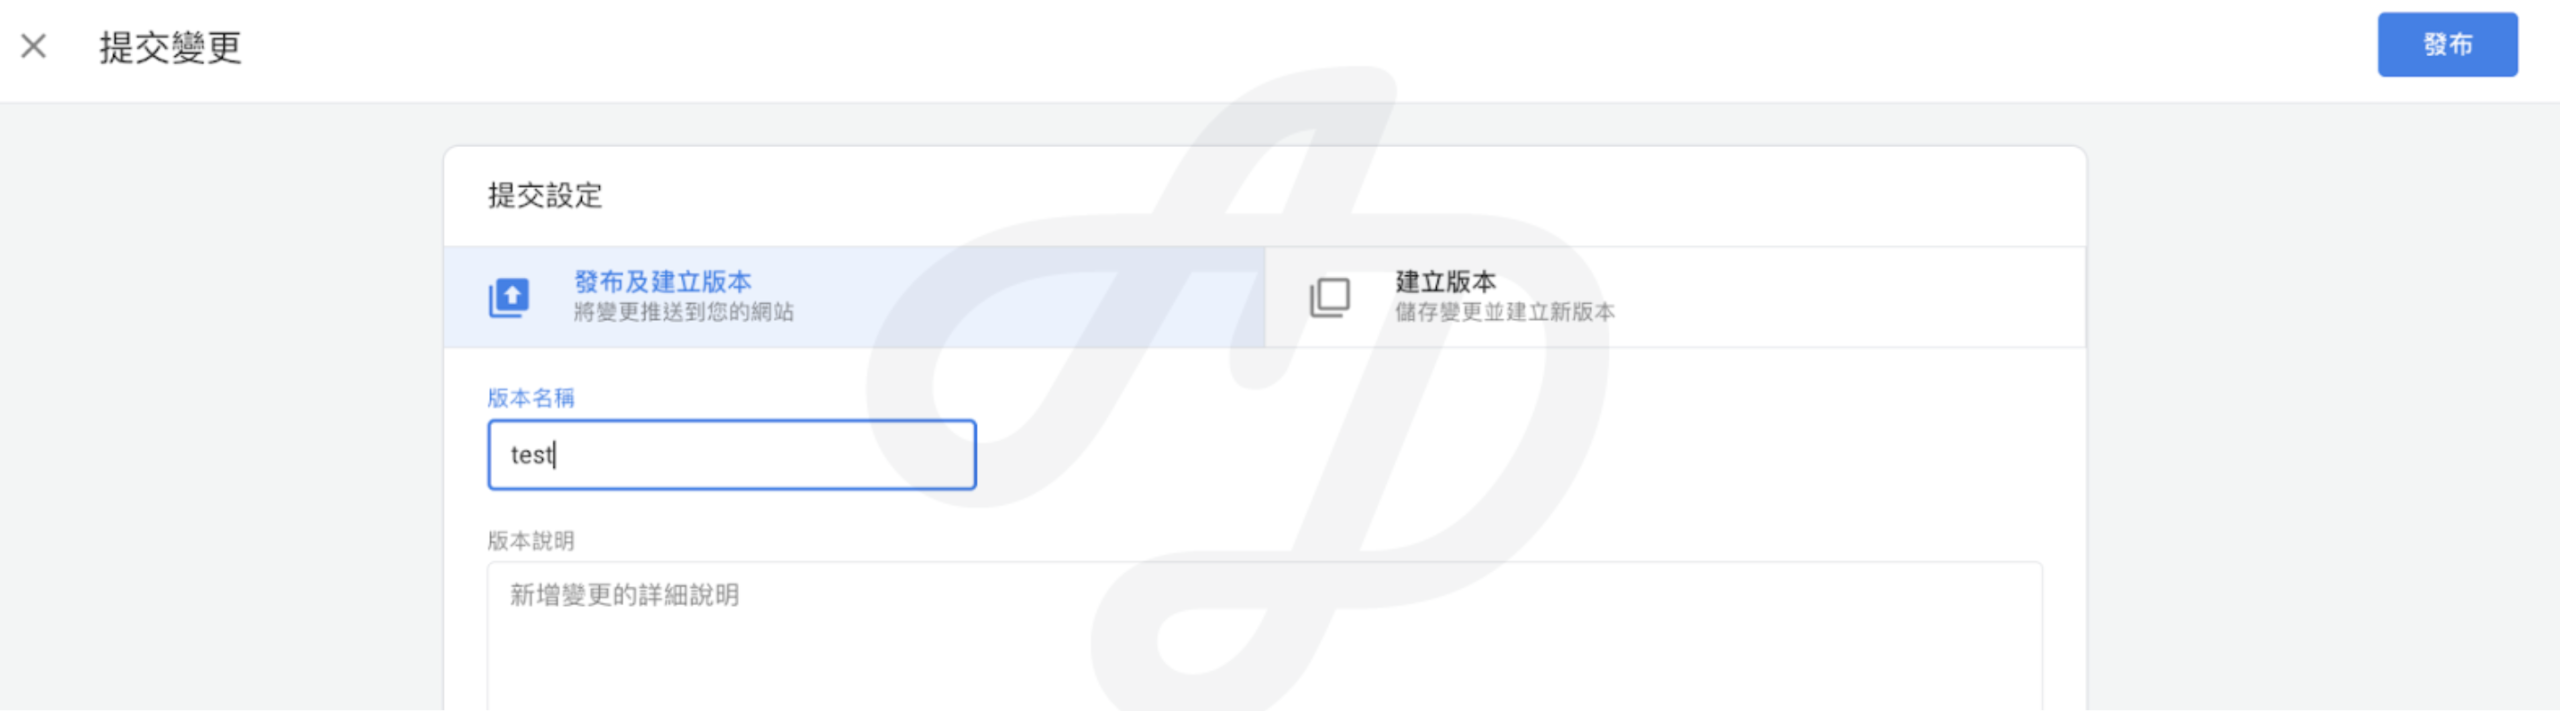
It is a good habit to fill in a version name and version description recording what this update includes, to make version control easier later.
Click “Publish” when you are done
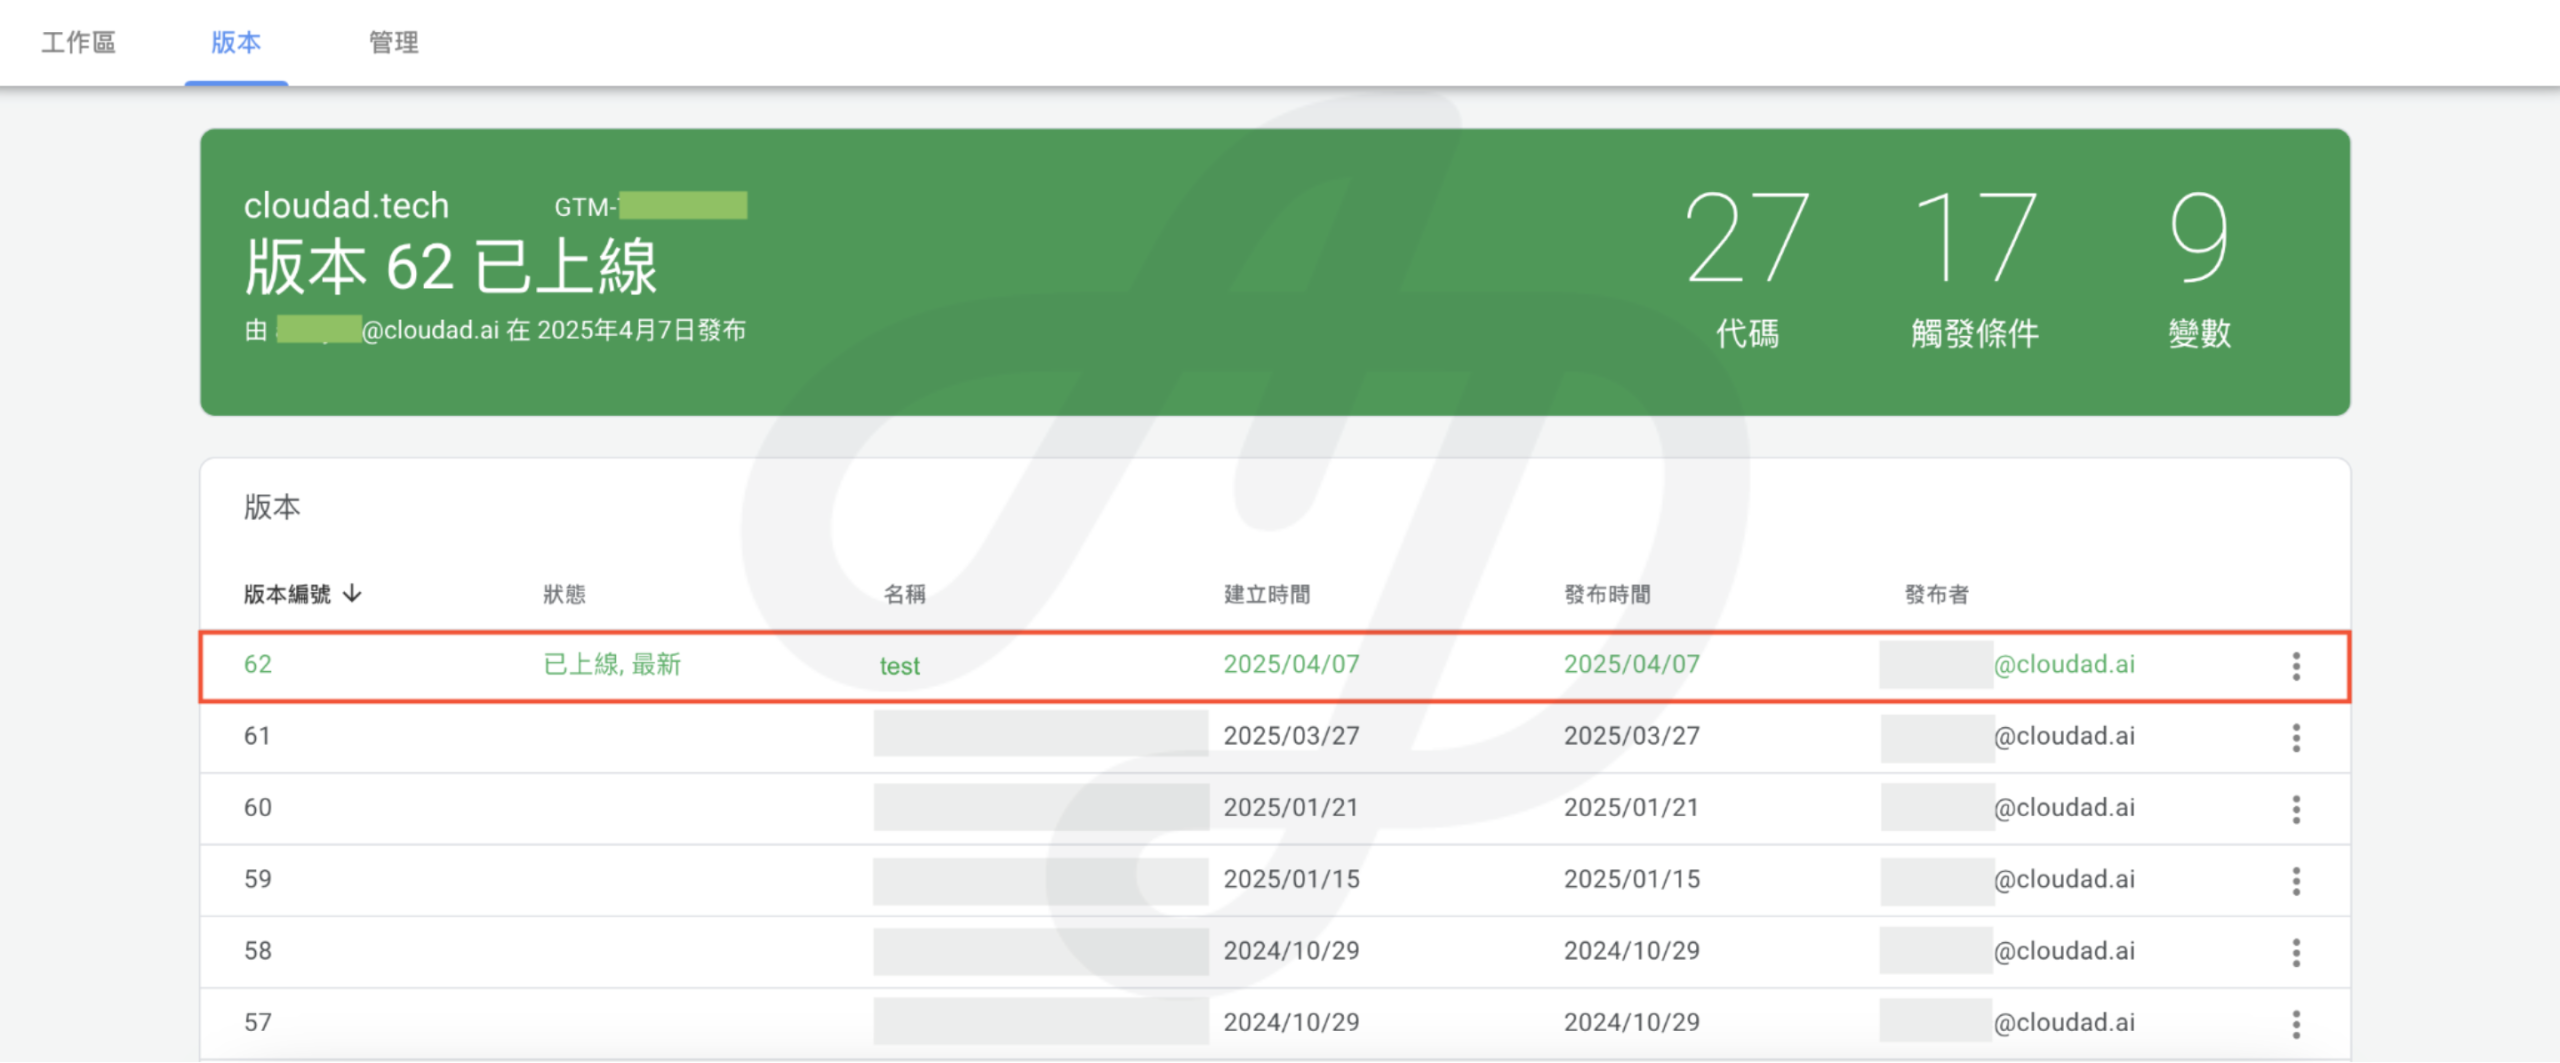
When you see this screen, the container has been published successfully.
Conclusion
You don’t need to rely on others for data tracking; marketers can do it too. With this guide and an understanding of the basic concepts of tags and triggers, you can set up event tracking yourself in GTM. This logic applies not only to button clicks but also to GA4’s recommended e-commerce events, form submissions and more, making data tracking simple and flexible.
If you are not sure which events your website could track, or you are stuck on GTM setup, CloudAD’s data team can provide full event tracking planning and technical support. From defining events and implementing and validating them to visualising them in reports, we can help your brand build an effective data tracking architecture, so get in touch.